Note: Future PhoneGap development articles will illustrate how to develop PhoneGap applications that interact with Adobe Experience Manager (AEM). One use case that you can perform is taking a picture with the mobile device's camera and then sending the photo to the AEM DAM.
This development article walks you through downloading the PhoneGap API, the Android SDK, and then how to use the IntelliJ IDEA to develop a PhoneGap application. The PhoneGap application is deployed to an Android device.
 |
| An Android PhoneGap application |
To create an Android PhoneGap application by using IntelliJ IDEA, perform these tasks:
- Install the Android SDK.
- Download the PhoneGap API.
- Create the PhoneGap application using Intellij IDEA.
Install the Android SDK
The first step to create an Android PhoneGap application is to install the Android SDK. You use the Android SDK from the IntelliJ IDEA. For information about installing the Android SDK, see the detailed instructions at http://developer.android.com/sdk/index.html.
Install the PhoneGap API
You can download the PhoneGap API from the following URL:
When downloading the PhoneGap API, you have library files for IOS devices, Android devices, Blackberry devices, and so on as shown in this illustration.
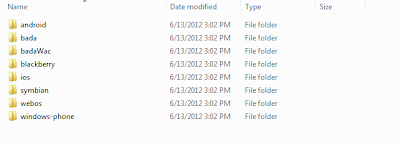 |
| PhoneGap library files |
This development article uses the PhoneGap API for Android. Download the PhoneGap ZIP file from the PhoneGap archive section, as shown here.
In this development article, the PhoneGap 1.8.1 is used. The three files that are used in this development article are cordova-1.8.1.jar, cordova.js, and plugins.xml.
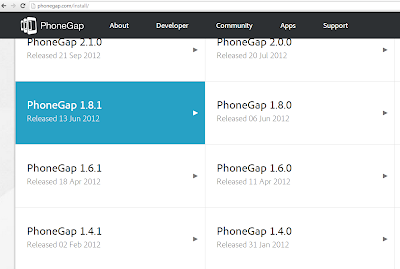 |
| PhoneGap Download options |
Note: You can also install the PhoneGap API using a command line. However, this development article does not use the command line to install the PhoneGap API.
Create an Android PhoneGap project using IntelliJ
After you have installed the Android SDK and downloaded the PhoneGap API, you can use IntelliJ IDEA to create an Android PhoneGap application. This development article uses IntelliJ version 12.1.6.
Create an IntelliJ project
The first step is to create an IntelliJ Android project as shown here.
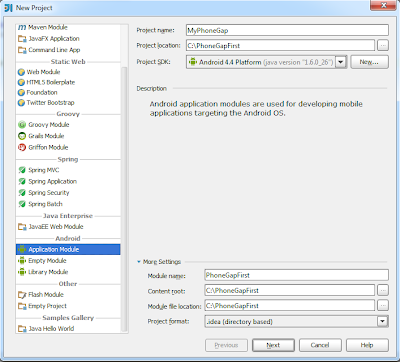 |
| IntelliJ Android New Project |
Create an Android PhoneGap project by performing these tasks:
- Start IntelliJ IDEA.
- Click File, New Project.
- In Project Name, type MyPhoneGap.
- In Project Location, specify a location for your project. In this example, C:\PhoneGapFirst is specified.
- In the Project SDK, specify the location to where you downloaded the Android SDK.
- Click Next.
- In the application name, specify a name for your application. Specify MyPhoneGap.
- In the package field, specify: com.example.PhoneGapFirst.
- In the Activity name field, keep the default value: MyActivity.
- Click the show device chooser dialog radio button.
- Click Finish.
Add sub folders to your project
After you create the IntelliJ Android project, your project should reflect the following illustration:
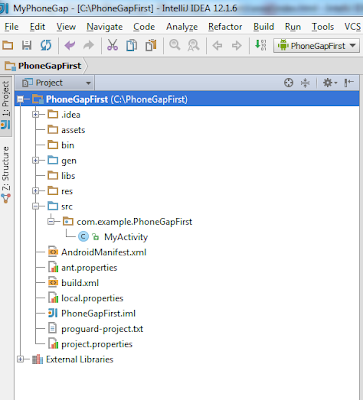 |
| Project files generated by IntelliJ |
Next, add new folders to your project. In the assets folder, create a sub folder named www. Place the cordova.js in the www folder.
Place the cordova-1.8.1.jar in the libs folder. Also add the cordova-1.8.1.jar to your IntelliJ project's class path. Right click on the Project Name ( PhoneGapFirst) and press F4. This action opens the Project Structure dialog.
Select Libraries and then click the little '+' icon near the top of the dialog. Select Java and browse to the cordoba.jar file. Click OK, then click OK again.
Expand the res folder, right click and create a new folder named xml. Copy the plugins.xml file from your PhoneGap installation and add this file to the xml folder.
The following illustration shows the PhoneGap files that you added to your Android IntelliJ project.
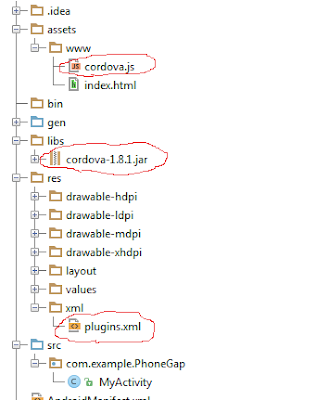 |
| PhoneGap files added to the IntelliJ project |
Modify the Java file
The next step is to modify the MyActivity Java class. Add the following import statement to this file:
import org.apache.cordova.*;
Next change the class that the MyActivity class extends from Activity to DroidGap. This class is the main Android activity that represents a PhoneGap application. For more information, see DroidGap.
The following represents the modified MyActivity class.
package com.example.PhoneGap;
import android.app.Activity;
import android.os.Bundle;
import org.apache.cordova.*;
public class MyActivity extends DroidGap
{
/** Called when the activity is first created. */
@Override
public void onCreate(Bundle savedInstanceState)
{
super.onCreate(savedInstanceState);
super.loadUrl("file:///android_asset/www/index.html");
}
}
Notice that the loadURL method references an HTML file named index.html. This is the HTML file where you can add your PhoneGap JavaScript logic. This PhoneGap JavaScript API is very rich API that lets you interact with most features of your smartphone. This development article simply writes out text.
Modify the AndroidManifest.xml file
Modify the AndroidManifest XML file located in your IntelliJ project. Copy and paste the following XML to this file between the <uses-sdk.../> and <application.../> tags:
<supports-screens
android:largeScreens="true"
android:normalScreens="true"
android:smallScreens="true"
android:resizeable="true"
android:anyDensity="true" />
<uses-permission android:name="android.permission.VIBRATE" />
<uses-permission android:name="android.permission.ACCESS_COARSE_LOCATION" />
<uses-permission android:name="android.permission.ACCESS_FINE_LOCATION" />
<uses-permission android:name="android.permission.ACCESS_LOCATION_EXTRA_COMMANDS" />
<uses-permission android:name="android.permission.READ_PHONE_STATE" />
<uses-permission android:name="android.permission.INTERNET" />
<uses-permission android:name="android.permission.RECEIVE_SMS" />
<uses-permission android:name="android.permission.RECORD_AUDIO" />
<uses-permission android:name="android.permission.MODIFY_AUDIO_SETTINGS" />
<uses-permission android:name="android.permission.READ_CONTACTS" />
<uses-permission android:name="android.permission.WRITE_CONTACTS" />
<uses-permission android:name="android.permission.WRITE_EXTERNAL_STORAGE" />
<uses-permission android:name="android.permission.ACCESS_NETWORK_STATE" />
<uses-permission android:name="android.permission.GET_ACCOUNTS" />
<uses-permission android:name="android.permission.BROADCAST_STICKY" />
The following XML represents the entire XML file.
<?xml version="1.0" encoding="utf-8"?>
<manifest xmlns:android="http://schemas.android.com/apk/res/android"
package="com.example.PhoneGap"
android:versionCode="1"
android:versionName="1.0">
<uses-sdk android:minSdkVersion="4" android:targetSdkVersion="4"/>
<supports-screens
android:largeScreens="true"
android:normalScreens="true"
android:smallScreens="true"
android:resizeable="true"
android:anyDensity="true" />
<uses-permission android:name="android.permission.VIBRATE" />
<uses-permission android:name="android.permission.ACCESS_COARSE_LOCATION" />
<uses-permission android:name="android.permission.ACCESS_FINE_LOCATION" />
<uses-permission android:name="android.permission.ACCESS_LOCATION_EXTRA_COMMANDS" />
<uses-permission android:name="android.permission.READ_PHONE_STATE" />
<uses-permission android:name="android.permission.INTERNET" />
<uses-permission android:name="android.permission.RECEIVE_SMS" />
<uses-permission android:name="android.permission.RECORD_AUDIO" />
<uses-permission android:name="android.permission.MODIFY_AUDIO_SETTINGS" />
<uses-permission android:name="android.permission.READ_CONTACTS" />
<uses-permission android:name="android.permission.WRITE_CONTACTS" />
<uses-permission android:name="android.permission.WRITE_EXTERNAL_STORAGE" />
<uses-permission android:name="android.permission.ACCESS_NETWORK_STATE" />
<uses-permission android:name="android.permission.GET_ACCOUNTS" />
<uses-permission android:name="android.permission.BROADCAST_STICKY" />
<application android:label="@string/app_name" android:icon="@drawable/ic_launcher" android:debuggable="true">
<activity android:name="MyActivity"
android:label="@string/app_name">
<intent-filter>
<action android:name="android.intent.action.MAIN"/>
<category android:name="android.intent.category.LAUNCHER"/>
</intent-filter>
</activity>
</application>
</manifest>
Notice the bolded line: android:debuggable="true". This lets you write your project to an Android device.
Add the HTML file that references the PhoneGap JavaScript file
In the assets/www folder that you created, add a new HTML file named index.html. This is the file where you can place your PhoneGap JavaScript code. However, for this article, the HTML writes text. Add the following HTML to this file.
<!DOCTYPE HTML PUBLIC "-//W3C//DTD HTML 4.01 Transitional//EN"
"http://www.w3.org/TR/html4/loose.dtd">
<html>
<head>
<script type="text/javascript" charset="utf-8" src="cordova.js"></script>
<title>Hello PhoneGap</title>
</head>
<body>
<h2>Hello, this is a very basic Android PhoneGap application!</h2>
</body>
</html>
Notice that the cordova.js file is referenced. This is how you can use the PhoneGap JavaScript API within an Android application.
Deploy your PhoneGap application to an Android Device
The final task is to deploy the PhoneGap to the Android device. For this to be successful, you have to perform a few tasks:
1. Declare your application as "debuggable" in your Android Manifest. (this is shown in this article).
2. Enable USB debugging on your device.
3. Configure your computer to detect your device. You may have to install a driver file.
For information about performing these tasks, see http://developer.android.com/tools/device.html.
Once you are done with these tasks, you can run your Android IntelliJ application. You will be presented with the Choose Device dialog:
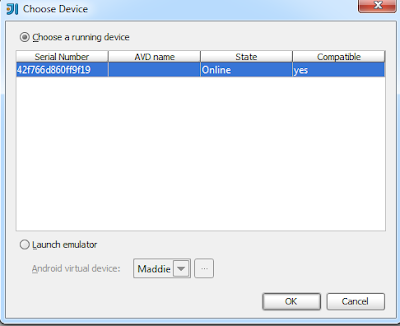 |
| The IntelliJ Choose Device dialog that shows a device |
Run your application and choose your device from the Choose Device dialog. Congratulations, you have just developed and deployed your first PhoneGap application using IntilliJ IDEA.
Join the Adobe Experience Cloud Community
Join the Adobe Experience Cloud Community by clicking this banner
I (Scott Macdonald) am a Senior Digital Marketing Community Manager at Adobe Systems with 20 years in the high tech industry. I am also a programmer with knowledge in Java, JavaScript, C#,C++, HTML, XML and ActionScript. If you would like to see more CQ or other Adobe Digital Marketing end to end articles like this, then leave a comment and let me know what content you would like to see.
Twitter: Follow the Digital Marketing Customer Care team on Twitter @AdobeExpCare.
YouTube: Subscribe to the AEM Community Channel.
Twitter: Follow the Digital Marketing Customer Care team on Twitter @AdobeExpCare.


