Most articles appearing on
Scott’s Digital Community discuss how to perform various tasks using Adobe Enterprise Products, such as Adobe CQ (part of
Adobe Digital Marketing Cloud). However, from time to time, general programming topics will also appear on this blog. This development article discusses how to create a Spring MVC project using Maven. For information about Spring MVC, see
http://static.springsource.org/spring/docs/2.0.x/reference/mvc.html.
NOTE: For a more detailed Spring MVC article that uses data persistence and JSLT tags, see
http://scottsdigitalcommunity.blogspot.ca/2013/05/developing-spring-mvc-project-using.html.
This development article guides you through how to create a Spring MVC project, including how to configure the Spring DispatcherServlet. This servlet dispatches client requests to handlers. The default handler is a controller interface that lets you work with a
ModelAndView instance.
To create a Spring MVC project using Maven, perform these tasks:
1.
Setup Maven in your development environment.
2.
Create a Maven project structure.
3.
Convert the Maven project to a Spring MVC project.
4.
Build the Maven project.
5.
Deploy the Maven project to an application server (in this development environment, the project is ran on Tomcat).
NOTE: To learn how to create a secure Spring application that uses a custom login page, click:
http://scottsdigitalcommunity.blogspot.ca/2014/08/creating-custom-login-page-for-secure.html.
Setup Maven in your development environment
You can use Maven to build and manage Java projects. One benefit of Maven is dependency management. What does this mean? Well -- it means that Maven manages required JAR files that a Java project needs in its class path. Therefore instead of hunting through the Internet trying to find and download third-party JAR files to include in your class path, Maven will manage these dependencies for you.
You can download Maven 3 from the following URL:
After you download and extract Maven, create an environment variable named M3_HOME. Assign the Maven install location to this environment variable. For example:
C:\Programs\Apache\apache-maven-3.0.4
Set up a system environment variable to reference maven. For example, name the environment variable M3_HOME. You can test to determine if Maven is properly setup by entering the following command into a command prompt:
%M3_HOME%\bin\mvn -version
This command provides Maven and Java install details and resembles the following message:
Apache Maven 3.0.4 (r1232337; 2012-01-17 03:44:56-0500)
Maven home: C:\Programs\Apache\Maven\apache-maven-3.0.4
Java version: 1.6.0_31, vendor: Sun Microsystems Inc.
Java home: C:\Programs\Java64-6\jre
Default locale: en_US, platform encoding: Cp1252
OS name: “windows 7”, version: “6.1”, arch: “amd64”, family: “windows”
Create a Maven project structure
You can use a Maven archetype plugin to create a project. To create a basic java application, you can use the maven-archetype-quickstart plugin. The following example creates a maven java application project in the C:\apache-maven-3.0.4\ folder.
To create a Maven project structure:
1. Open the command prompt and go to the C:\apache-maven-3.0.4 directory.
2. Run the following Maven command:
mvn archetype:generate -DgroupId=com.sdc.controller -DartifactId=FirstController -DarchetypeArtifactId=maven-archetype-quickstart -DinteractiveMode=false
You will see a Maven message similar to the following:
[INFO] Using following parameters for creating project from Old (1.x) Archetype:
maven-archetype-quickstart:1.0
[INFO]
[INFO] Parameter: groupId, Value: com.sdc.controller
[INFO] Parameter: packageName, Value: com.sdc.controller
[INFO] Parameter: package, Value: com.sdc.controller
[INFO] Parameter: artifactId, Value: FirstController
[INFO] Parameter: basedir, Value: C:\apache-maven-3.0.4
[INFO] Parameter: version, Value: 1.0-SNAPSHOT
[INFO] project created from Old (1.x) Archetype in dir: C:\apache-maven-3.0.4\FirstController
[INFO] BUILD SUCCESS
[INFO] Total time: 3.347s
[INFO] Finished at: Sun Jan 20 16:49:18 EST 2013
[INFO] Final Memory: 8M/122M
This Maven command produces a basic project structure that contains a POM file and basic Java class.
The POM file that is generated is in the FirstController directory. The Maven command produces a Java file named App.java in the com.sdc.controller folder. For this development environment, the App class is not used. Instead, it is replaced by a Java class named FirstController in the next step.
NOTE: Delete the test folder.
Convert the Maven generated project to a Spring MVC project
The next step is to convert the generated Maven project into a Spring MVC project. This involves performing the following tasks:
1 – Add the Java class named FirstController to the com.sdc.controller folder.
2- Modify the POM file to include Spring MVC dependencies.
3 – Add a new folder named webapp to the src/main folder. This folder contains the WEB-INF folder.
Add the FirstController class to the Maven generated project
Create the FirstController Spring MVC class and make sure that it is in the com.sdc.controller package. This class uses Spring annotations such as the RequestMapping and Controller. The Controller annotation defines the class as a Spring MVC controller. Notice the RequestMapping annotation specifies hi. You can invoke this controller by specifying hi in the URL. (This is shown at the end of this article.)
The following class represents the FirstController class.
package com.sdc.controller;
import org.springframework.stereotype.Controller;
import org.springframework.ui.ModelMap;
import org.springframework.web.bind.annotation.RequestMapping;
import org.springframework.web.bind.annotation.RequestMethod;
@Controller
@RequestMapping("/hi")
public class FirstController {
@RequestMapping(method = RequestMethod.GET)
public String printWelcome(ModelMap model) {
model.addAttribute("message", "Spring 3 MVC Hello LAM”;
return "hello";
}
}
Modify the POM file to include Spring MVC dependencies
Replace the POM that the Maven plug-in created with the following POM file. This new POM includes Spring dependencies that are required to use Spring MVC functionality.
<project xmlns="http://maven.apache.org/POM/4.0.0" xmlns:xsi="http://www.w3.org/2001/XMLSchema-instance"
xsi:schemaLocation="http://maven.apache.org/POM/4.0.0 http://maven.apache.org/maven-v4_0_0.xsd">
<modelVersion>4.0.0</modelVersion>
<groupId>com.sdc.controller</groupId>
<artifactId>FirstController</artifactId>
<packaging>war</packaging>
<version>1.0-SNAPSHOT</version>
<name>SpringMVC Maven Webapp</name>
<url>http://maven.apache.org</url>
<properties>
<spring.version>3.0.5.RELEASE</spring.version>
</properties>
<dependencies>
<!-- Spring 3 dependencies -->
<dependency>
<groupId>org.springframework</groupId>
<artifactId>spring-core</artifactId>
<version>${spring.version}</version>
</dependency>
<dependency>
<groupId>org.springframework</groupId>
<artifactId>spring-web</artifactId>
<version>${spring.version}</version>
</dependency>
<dependency>
<groupId>org.springframework</groupId>
<artifactId>spring-webmvc</artifactId>
<version>${spring.version}</version>
</dependency>
</dependencies>
<build>
<finalName>FirstController</finalName>
<plugins>
<plugin>
<artifactId>maven-compiler-plugin</artifactId>
<configuration>
<source>1.6</source>
<target>1.6</target>
</configuration>
</plugin>
</plugins>
</build>
</project>
Add the webapp folder to the Maven project structure
Add a new folder named webapp to the main folder. Add a subfolder named WEB-INF to the webapp folder. You add the following three files to this WEB-INF folder: web.xml, mvc-dispatcher-servlet.xml, and first.jsp. The first.jsp file calls the Java application logic defined within the controller.
The web.xml file defines servlets for the web application (after all, a Spring MVC project is a web application). Within the web.xml file, you specify a Spring MVC servlet. A Spring MVC servlet is based on org.springframework.web.servlet.DispatcherServlet. In the following example, the name of the Spring dispatcher servlet is mvc-dispatcher.
The following represents the web.xml file.
<web-app id="WebApp_ID" version="2.4"
xmlns="http://java.sun.com/xml/ns/j2ee" xmlns:xsi="http://www.w3.org/2001/XMLSchema-instance"
xsi:schemaLocation="http://java.sun.com/xml/ns/j2ee
http://java.sun.com/xml/ns/j2ee/web-app_2_4.xsd">
<display-name>Spring Web MVC Application</display-name>
<servlet>
<servlet-name>mvc-dispatcher</servlet-name>
<servlet-class>org.springframework.web.servlet.DispatcherServlet</servlet-class>
<load-on-startup>1</load-on-startup>
</servlet>
<servlet-mapping>
<servlet-name>mvc-dispatcher</servlet-name>
<url-pattern>/</url-pattern>
</servlet-mapping>
<context-param>
<param-name>contextConfigLocation</param-name>
<param-value>/WEB-INF/mvc-dispatcher-servlet.xml</param-value>
</context-param>
<listener>
<listener-class>org.springframework.web.context.ContextLoaderListener</listener-class>
</listener>
</web-app>
Notice within the context-param element, the param-value element specifies /WEB-INF/mvc-dispatcher-servlet.xml. This specifies the location of the mvc-dispatcher-servlet.xml. A dispatcher servlet XML configuration file is named [Dispatcher Servlet name]-server.xml. In this example, the name of the dispatcher servlet is mvc-dispatcher. Therefore the configuration file is named mvc-dispatcher-servlet.xml (this is the file that is created next).
The mvc-dispatcher-servlet.xml informs the Spring framework where to find the controller (in this article, the controller is the FirstController class. The dispatcher configuration uses the following element to specify the location of the controller:
<context:component-scan base-package="com.sdc.controller" />
This XML element informs the Spring framework to search the com.sdc.controller package for a controller. The following XML represents the mvc-dispatcher-servlet.xml file.
<beans xmlns="http://www.springframework.org/schema/beans"
xmlns:context="http://www.springframework.org/schema/context"
xmlns:xsi="http://www.w3.org/2001/XMLSchema-instance"
xsi:schemaLocation="
http://www.springframework.org/schema/beans
http://www.springframework.org/schema/beans/spring-beans-3.0.xsd
http://www.springframework.org/schema/context
http://www.springframework.org/schema/context/spring-context-3.0.xsd">
<context:component-scan base-package="com.sdc.controller" />
<bean
class="org.springframework.web.servlet.view.InternalResourceViewResolver">
<property name="prefix">
<value>/WEB-INF/pages/</value>
</property>
<property name="suffix">
<value>.jsp</value>
</property>
</bean>
</beans>
The last file to create is the JSP file named hello.jsp. In this example, place the JSP file in a folder named pages (this is a sub-folder to WEB-INF). All this JSP does display the value of ${messages) which was populated in the Java controller method named printWelcome.
<html>
<body>
<h1>Message : ${message}</h1>
</body>
</html>
In this example ${message} maps to the line of Java code in the controller class:
model.addAttribute("message", "Spring 3 MVC Hello LAM");
Therefore when this JSP is displayed (the JSP is the view in this use case), the data that is displayed in the web browser is Spring 3 MVC Hello LAM.
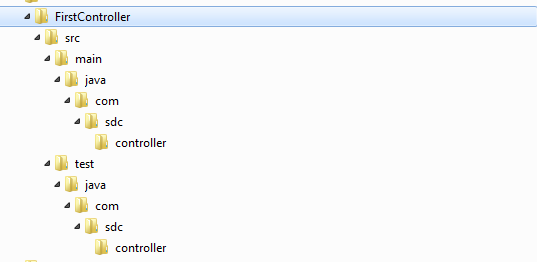
The following illustration shows the webapp folder structure and validates where the files are placed. In the pages folder, place the hello.jsp file. The reason why the JSP file is named hello.jsp is because in the Java controller method, notice that the return value is "hello". This is the connection between the controller method and the view.
Build the Maven project
After you convert the generated Maven project to a Spring MVC project, you can build the artifact by using Maven. The artifact that is built is a WAR file, as specified in the POM file. In this example, the packaging element in the POM file specifies war:
<modelVersion>4.0.0</modelVersion>
<groupId>com.sdc.controller</groupId>
<artifactId>FirstController</artifactId>
<packaging>war</packaging>
<version>1.0-SNAPSHOT</version>
<name>SpringMVC Maven Webapp</name>
<url>http://maven.apache.org</url>
To create the package by running Maven:
1 - Start the Command Prompt.
2. Change the directory to the location of POM file.
3. Enter the following command: %M3_HOME%\bin\mvn clean package.
4. The WAR file is placed in the target directory. In this example, the WAR file is named FirstController.war.
Deploy the WAR file to Tomcat
Deploy the WAR file that was built in the previous step by placing it in the Tomcat\webapps folder. Restart Tomcat. Once Tomcat is started, you can view the Spring MVC application by entering the following URL:
[server name]:[port/FirstController/hi
The following illustration shows the message generated by the controller class in a web browser.
The FirstController part of the URL is the name of the web app. The hi part of the URL maps to the value that was specified in the RequestMapping annotation in the controller class.
@Controller
@RequestMapping("/hi")
public class HelloController {
@RequestMapping(method = RequestMethod.GET)
public String printWelcome(ModelMap model) {
model.addAttribute("message", "Spring 3 MVC Hello LAM");
return "hello";
}
}
Conclusion
This article walked you through how to set-up a Spring MVC project using Maven and highlighted how the dispatcher, controller and view work together. Once you understand this, you can start to work on more complex Spring MVC applications.
Join the Adobe Experience Cloud Community
Join the Adobe Experience Cloud Community by clicking this banner
I (Scott Macdonald) am a Senior Digital Marketing Community Manager at Adobe Systems with 20 years in the high tech industry. I am also a programmer with knowledge in Java, JavaScript, C#,C++, HTML, XML and ActionScript. If you would like to see more CQ or other Adobe Digital Marketing end to end articles like this, then leave a comment and let me know what content you would like to see.
Twitter: Follow the Digital Marketing Customer Care team on Twitter @AdobeExpCare.


